Portal Integration
Managers and consultants create their own API integration through the portal: they create the integration, register the public key and receive the API Key right there. No key ever travels by email.
Registering the public key through the screen is the recommended procedure for managers and consultants, in both Sandbox and Production. Sending the public key by email is treated as an exception — see When email delivery is still used.
Through the portal the key is registered by the person responsible, with an explicit confirmation and the fingerprint visible on screen. This removes the manual handover of files between mailboxes, reduces the risk of registering the wrong key, and lets you create new integrations at any time, without opening a ticket.
Flow overview
| Step | Who does it | Where |
|---|---|---|
| 1. Master user registration | QI Tech integration team | From your contact by email or WhatsApp |
| 2. Portal access | Master user | Manager Portal or Consultant Portal |
| 3. Creation of other users and permissions | Master user | Portal, under Gestão de Acesso > Usuários (Access Management > Users) |
| 4. Integration creation | Master user or a user with permission | Portal, under Gestão de Acesso > Integração API (Access Management > API Integration) |
| 5. Public key registration | User with permission | Portal, on the integration screen |
| 6. Integration permission grant | QI Tech integration team | Shown on the same screen once completed |
| 7. Webhook configuration (optional) | User with permission | Portal, on the integration screen |
1. Request the master user registration
Contact the QI Tech integration team by email (integracao.dtvm@qitech.com.br) or WhatsApp providing, for the person responsible for the homologation:
- Full name
- Corporate email
- CPF
With this information we create the master user for the manager or the consultant in the requested environment. This user is the starting point: they create the other users, grant permissions and create the API integrations.
The request contains only the name, email and CPF of the person responsible. Do not send the public key in that message — you register it yourself in the portal, in step 5. And the private key is never sent to anyone, under any circumstances: QI Tech will never ask you to share it.
2. Access the portal
| Profile | Environment | Portal |
|---|---|---|
| Manager | Sandbox | https://portal-do-gestor.sandbox.fundos.qitech.com.br/ |
| Manager | Production | https://portal-do-gestor.fundos.qitech.com.br/ |
| Consultant | Sandbox | https://portal-do-consultor.sandbox.fundos.qitech.com.br/ |
| Consultant | Production | https://portal-do-consultor.fundos.qitech.com.br/ |
Access is done through single sign-on (SSO) with the email registered in the previous step.
3. Create the other users and grant permissions
Only the master user (or whoever they authorise) can see the integration screen. To give access to other people on your team:
- Go to Gestão de Acesso > Usuários (Access Management > Users) and click Criar usuário (Create user).
- Provide Nome (first name), Sobrenome (last name), E-mail and CPF.
- Open the user you created and grant the integration permission:
- Manager: Gerenciar Integração API
- Consultant: Gerenciar integração com a API
Without this permission the Integração API item does not appear in the menu.
4. Create the integration
Under Gestão de Acesso > Integração API, click Criar integração (Create integration) and give it a name that identifies its use (for example, ETL noturno or Backoffice).
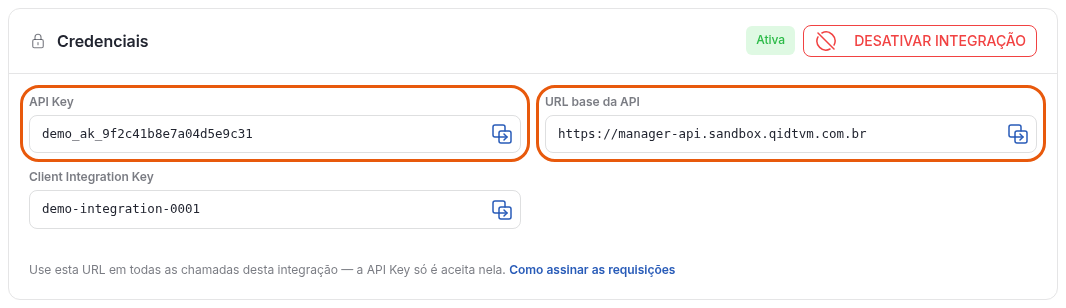
On confirmation, QI Tech generates the integration credentials and the detail screen opens. They are in the Credenciais (Credentials) block, at the bottom of the screen, and can be copied at any time through the same path:
| Credential | What it is for |
|---|---|
| API Key | Goes in the API-CLIENT-KEY header of every request. It is the api_key of the Authentication Test. |
| URL base da API (API base URL) | The host that receives this integration's calls, already for the portal's profile and environment. It is the base_url of the Authentication Test. |
| Client Integration Key | Identifier of the integration. Use it to refer to the integration when contacting the integration team. |
The API key is only accepted on that URL: your profile's host (manager-api in the Manager Portal, consultant-api in the Consultant Portal), in the environment where the integration was created. The full list of hosts is in Environments (Hosts).
The same manager or consultant may keep several active integrations at the same time, each with its own API key and public key — useful for separating internal systems or environments.
The integration starts with status Criada (Created). It only becomes Ativa (Active) after the public key is registered.
5. Register the public key
On the integration screen, click Cadastrar chave pública (Register public key). There are two ways to do it.
Option A — Generate the key pair in the browser
The portal generates the pair directly in your browser and downloads the private key to your machine. The private key is never sent to QI Tech: only the public key is transmitted.
- Choose the Algoritmo da chave (Key algorithm).
- Click Gerar par de chaves (Generate key pair). The private key download starts automatically.
- Store the private key in a safe place — it is not shown again and cannot be recovered. If needed, use Baixar chave privada (Download private key) and Baixar chave pública (Download public key) before leaving the screen.
- The public key is already filled in the form. Confirm to register it.
Each algorithm determines the alg you must use when signing the JWT of your requests:
| Algorithm in the portal | JWT signature |
|---|---|
| RSA 2048 (recommended) | RS256 |
| RSA 4096 | RS256 |
| EC P-256 | ES256 |
| EC P-384 | ES384 |
| EC P-521 | ES512 |
Option B — Upload your own public key
If you already generated the pair outside the portal — see Key Exchange — send the public key only:
- Drag the file onto the indicated area, or click to select it (
.pem,.pub,.key,.crtor.txt); or - Paste the PEM content into the text field.
The portal identifies the key algorithm and shows, below the field, which alg you must use to sign your requests.
Requirements and rejections
The key must be in PEM format, inside a -----BEGIN PUBLIC KEY----- block. The portal rejects the registration in the following cases:
| Situation | Reason |
|---|---|
Private key content (BEGIN ... PRIVATE KEY) | The private key must never be sent |
Certificate (BEGIN CERTIFICATE) | Not a public key |
OpenSSH format key (ssh-rsa, ecdsa-sha2-...) | Convert it to PEM |
| RSA smaller than 2048 bits | Below the accepted minimum |
| Unreadable PEM | Corrupted or incomplete content |
To confirm, type CADASTRAR in the confirmation field. Registration is immediate: the integration starts using that key as soon as you confirm.
Each integration receives a single public key. If you need another key — for periodic rotation, or loss or leak of the private key —, create a new integration. See Replace the key of an integration.
Once registered, the screen shows the key's Fingerprint (SHA-256) and the registration date. Use the fingerprint to check that the registered key is indeed yours.
6. Integration permission grant
Consultants do not go through this step: authorisation comes from the consultant's fund permissions, and the integration is ready to use right after the key is registered.
For managers, the last step is granting the integration's Leitura (Read) and Escrita (Write) permissions, done by the QI Tech integration team. There is no need to wait on the screen — the status appears under Permissões (Permissions) once the grant is completed.
7. Configure webhooks (optional)
Still on the integration screen, the Webhooks block lets you register the destination URL for notifications. The available systems are:
| System | Events |
|---|---|
| Assignor registry | Analyses, assignor registrations and pending items |
| Assignment contracts | Assignment contract and product statuses |
| Receivables | Assignments and assets in the receivables pipeline |
| Settlement | Payment batches and settlements |
You can use the same URL for all systems or one URL per system. Each system generates its own HMAC signature key, used to validate the deliveries you receive — see Receiving Webhooks.
The webhook configuration applies to the manager or consultant as a whole, not per integration. If there is more than one API integration, they all share the same configuration.
Deactivating and reactivating the integration
Desativar integração (Deactivate integration, confirmed with DESATIVAR) makes every call using that credential be refused. Nothing is deleted: the public key, the permissions and the webhooks remain saved and take effect again on reactivation.
Use deactivation as the immediate response to a suspected private key leak. Since the key cannot be changed, do not reactivate the compromised integration: replace it with a new one.
Replace the key of an integration
To start using another key without interrupting operations:
- Create a new integration (step 4) and register the new public key on it (step 5).
- For managers, wait for the permissions of the new integration to be granted (step 6).
- Update your application with the new API key and the new private key — both change together.
- Run the Authentication Test with the new credentials.
- Deactivate the old integration.
Webhooks do not need to be reconfigured: the configuration applies to the manager or consultant, not per integration.
Going live
The procedure in Production is the same. Send the integration team, by email, the name, email and CPF of the master user of the manager or consultant in the Production environment. From that master user's access onwards, creating the other users, granting permissions and creating the API integrations are done by you, through the portal — with no further contact with the team.
Sandbox credentials are not valid in Production: each environment has its own integrations, keys and API Keys.
Real data from natural persons and/or legal entities must not be used in QI Tech's Sandbox environments.
When email delivery is still used
Portal registration is available to managers and consultants. The remaining access profiles — assignors, originators, investors and distributors — still send the public key to the integration team, as described in Key Exchange.
If you are a manager or a consultant and do not have portal access yet, request the master user through step 1 instead of sending the key by email.